Close

Plaid Plarn Wallet

Creating plaid using recycled plastic bags has been on my to-do list for quite some time. This last week I finally set out on what I call my plaid plarn project. I wanted to keep it simple and small as I found making a plaid design with recycled plastic bags very challenging. It was a trial and error project which needed to be tackled on a small item until I could prefect my process. Needless to say, I got a bit frustrated but finally came up with this little wallet as my finished product.

Crocheting the surface chaining is a bit challenging to get the stripes straight. I had to work a few stitches a bit off to get my vertical stripe to look somewhat straight. Below is my piece once I was finished. It’s not perfect but that is the beauty of working with recycled crafts, it doesn’t have to be perfect. You are creating something new from trash so there is always beauty is each finished product. Hope you enjoy this plaid plarn project and remember it doesn’t have to be perfect for you to enjoy your wallet.

Plaid Plarn Wallet Pattern

Materials needed:
One ball of white plastic bags cut into plarn about 3/4 inch wide
Small amount of salmon pink newspaper bags cut into plarn about 3/4 inch wide
Here is my link for plarn making tutorials for newspaper and retail plastic bags.
1) 1/2 inch button

Hooks:
J (6 mm) size metal crochet hook
H (5 mm) size metal crochet hook for button loop

Description: Plaid plastic wallet
Wallet measures 5 inches wide and 9-1/2 inches tall
with 2 inch long flap

Directions:
Using J hook with white plarn, Ch 17.

Blocking and Crocheting a T-Shirt Yarn Rug

This week’s project is a rug I crocheted from a couple of old white t-shirts and the remaining pieces of a blue jersey sheet. I cut my cotton into 3/4 inch wide strips using my t-yarn making tutorial. Recycling t-shirts and old cotton sheets is a great way to repurpose those old items into new usable rugs, oven mitts, trivets, baby bibs, and more.

Once completed, this t-yarn rug had a problem. The center was not flat and the rug needed blocking badly so this week’s project turned into a two-fold post. A blocking tutorial for t-shirt yarn rugs and the free crochet pattern for the rug.

I didn’t take a photo of the rug before blocking but trust me, the center was all rumpled up and the rug wasn’t laying down flat. I used the same process I did when I blocked a round ripple afghan that was bowl-shaped in the center. My blocking method helped flatten both projects and really saved me a lot of frustration so I wanted to share how I did it. So first I will show how to block a t-shirt yarn rug.

Lay the rug down and stretch it out on a large piece of plastic on the carpet. I used a large trash bag and then just reuse it for the next blocking project. I pin it all around as I stretch the rug and shape it. Use lots of pins and push them down into the carpet to hold the rug in place. Then using a wet rag or wash cloth, press down and wet the rug. Move your cloth around and continue to wet it and as you do, shape and stretch your rug. I laid a wash cloth down as shown and with my hands flat, I move my hands around on top of the cloth. My center was the real problem area so I pressed down and wet this area more as I worked out the rumpled center.
Click on any photo to supersize

Next photo shows after I have been shaping and flattening out the center. Move your pins as needed to get the rug flat and a nice shape. Gently pull on the corners and edges to get it as straight and square as possible. Apply more water on a rag as needed.

Once you have the center flat and the rug shaped, its time to let it dry. I let my rug dry overnight with the pins in place. The next day, I removed the pins and flipped it over gently and let the back dry. The next morning the rug was completely dry and the rug held its shape rather nicely.

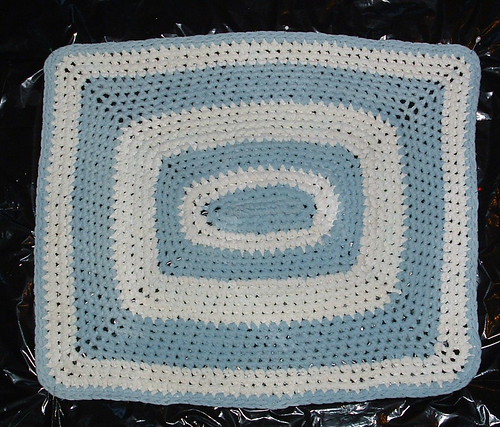
Closeup of the t-yarn rug once it was blocked and flatten. As you can see its pretty flat and I can live with how it looks now. I hope you find this t-yarn blocking tutorial useful should you find your rug or other projects need a little flattening.

Below […]

Thrift Store Dolls Refurbished

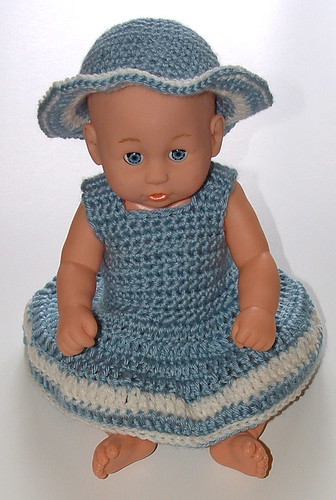
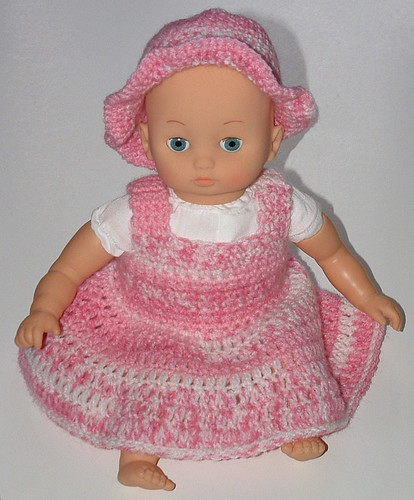
My latest recycled crafting project involves these two baby dolls. I got these dolls at my local thrift store. Both dolls just needed a little cleaning and a new outfit. I crocheted both dolls a new dress and hat. Buying these used dolls was very reasonable. One was only 99 cents and the other $1.99 but with new outfits, they have a new life and look great. They both will be going to my local woman’s shelter for some little girls to find joy with a new baby doll.

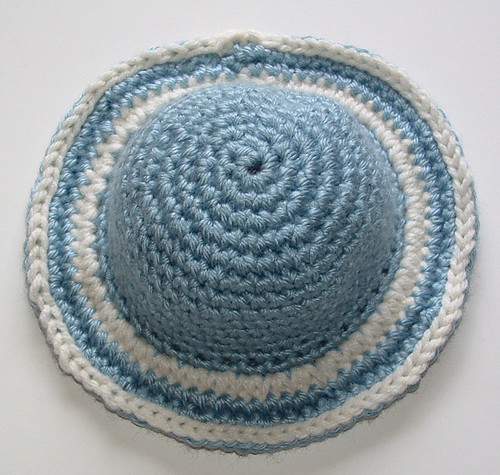
Here is a closeup of the hat. I worked one round in white yarn and then did white trim by working a slip stitch in the final round. You can click on any of the photos to supersize them.

I used Hooksandknives.blogspot.com doll dress and hat pattern for both outfits. I crocheted using a H (5 mm) hook with worst weight 4 ply yarn. My dolls are 12 inches tall and I did a little modification on the neckline and straps as outlined below. Unfortunately the blog that was hosting the original doll dress and hat patterns is no longer in existence as of 2015. But I was able to find the pattern details and added them to the post below.

**Original Doll and Hat pattern from Hooksandknives.blogspot**
Doll Dress Pattern

Body of dress
Ch 35
Row 1: sc in the 2nd ch from the hook, sc across to end (34 sc)
Row 2: ch 1, turn. sc across
Rows 3 to 9: repeat row 2
Row 10: ch 1, turn. sc in the first st, (2sc in the next st, sc in the next st) repeat to end, ending with sc in the last st
Row 11: ch 3, turn. dc in each st across.
Row 12: ch 3, turn. dc in first st, 2dc in next st, (dc in next 2 sts, 2dc in next st), repeat across, then dc in last st
Row 13: repeat row 11
Row 14: repeat row 11
Row 15: repeat row 12
Row 16: repeat row 11
Row 17: repeat row 12
Row 18: repeat row 11. Finish off, leaving a long tail, about 18 inches. Use this for sewing the back together up to last sc row. Leave the rest of the sc rows unsewn, allowing an opening for dressing the doll easily. Weave in ends.

Straps (make 2)
Ch 15.
Row 1: sc in 2nd ch from hook. sc across to end.
Row 2: ch 1, turn. sc across to end. Fasten off, leaving 10 inch tail for sewing one end. Sew ends to front and back of dress.

Ties (make 2) Used for closing top of back of dress by tying in a bow
Ch 30.
Sl st in 2nd ch from hook. sl ti in each st across to end. Fasten off, leaving tail for sewing. Sew each tie to the top corners of the back of dress.

Hat Pattern

Worked as a spiral without joining. Use stitch markers […]

Plarn Bucket Basket


This week I crocheted a little bucket basket from recycled pink newspaper bags. I created this bucket basket as a gift to my local library for saving all the plastic newspaper bags they receive their newspapers in daily. Each week I pick up these bags and use them in my recycled crafting projects. I feel so fortunate to get these beautiful and uniquely colored bags.

I recycled this jam container for my plastic bag crafting project. As outlined in the pattern below, you insert the plastic jam container inside the crocheted plarn bucket. Once finished, I filled the bucket with candy and presented it to my local library staff. This was their first time really seeing a finished product I crafted from their recycled plastic bags. I think they were happily surprised to see something pretty as well as useful made from their old newspaper bags that I collect from them.

So I hope I have inspired you and you will give this recycled crochet basket project a go. Best wishes and happy green crafting to all!

****************************************************************************************************************************

Plarn Bucket Basket Pattern

Materials:
One ball of pink plarn (plastic bag yarn) Appox. 20 bags
3 white plastic bags for edging
1 recycled jam container (4 inches wide by 4 inches tall used)

Hook: Metal J (6 mm) US size hook

Description: Crochet basket measures 4 inches wide and 4 inches tall with 8 inch handle

Directions:
Ch 4 and join with a sl st to form a ring.

Hummingbird Feeding Fun

Here are a few photos I shot today of some hummingbirds that were feeding off my feeder. Don’t worry if it looks empty as I am using clear juice for them and it’s just below the red rim so you can’t see the juice line.

These birds just love my homemade hummingbird juice. This is the second year that I have been making up my own home brew for them. Here is the link to my homemade hummingbird juice recipe that I posted last year.


I actually had 3 birds drinking all at the same time but couldn’t get a picture of them. They move so fast that by the time I try and click the picture, they have moved.


Here is a great shot showing the beautiful back of this hummingbird. She’s just so pretty with her yellow spots.


Another photo of the same bird drinking from my hummingbird feeder.


One last photo of one of the “girls” posing for the camera. They are just such beautiful creatures. Now I am off to make another batch of my brew for them as I’m sure the feeder is nearly empty now.