Close

Essay: Recycling Plastic Bags

What is the most popular common item that pollutes natural environment? Without doubt, it is the plastic bag. The plastic bag is the most usual and integral part of our life. Sometimes, we do not pay attention to the fact that every store provides us with packs of plastic bags. They are used as sacks or wraps of food products and all other kinds of goods. There is hardly a person who does not carry her goods from a shop in a small or big plastic bag. When you enter a supermarket, you take a plastic bag automatically in order to keep apples, potatoes, oranges or biscuits there. An average customer takes more than ten plastic bags being in a supermarket. Thus, a supermarket uses thousands of bags daily. A chain of supermarkets uses millions of plastic bags annually. When we take a plastic bag, we do not think about its fate. We do not think about the problems that can occur when we throw it away. The effect of this action is dramatic whereas this item requires hundreds of years to be recycled in the natural way. Therefore, billions of plastic bags pollute seas, oceans, rivers and soil. Very often, plastic bags are found in the stomachs of fish, birds and wild animals. Needless to say but such a simple thing as a plastic bag can kill an animal. What is more, plastic bags spoil the general view of our streets and parks. Although they do not cause harm directly, the view of lying plastic bags in the street is not aesthetic. Thereof, it is vital to collect plastic bags and utilize them making our planet cleaner.

The best way to stop the enormous rates of littering is to recycle plastic bags inasmuch as they are the main sources of pollution. Many people think that it is impossible to recycle plastic bags. Others think that plastic bags are ecologically unsafe and they prefer using paper bags. In fact, scientists have proved that plastic bags are safe and more profitable than paper bags. According to the latest information, no more than 0.5% of one barrel of oil is used for the production of all plastic bags that are used in the USA. For that reason, plastic bags are more economical whereas a paper bag requires 70% more energy for its production. Consequently, paper bags contribute into the increase of the rates of global warming process. In addition, natural gas and oil is not as considerable as wood.

How can one recycle plastic bags?
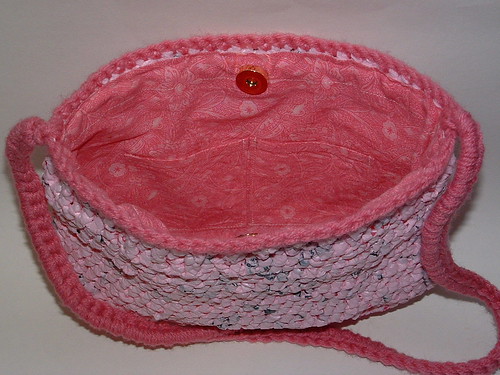
Lining a Crochetville Bag


Here is my Crochetville bag that I was the proud recipient of from Mary Jo in September 2012. Each month Mary Jo aka Tampa Doll makes one of her famous tote bags and gives it to some lucky person on Crochetville. I was so excited when I received my bag. It’s just so cool and such a wonderful gift to receive from another crocheter.

One of the things Mary Jo tells you when you receive her bag is that you may want to line it. Because it is crocheted, it does have holes in the tote bag that small items can fall out of. I was being carefully but did have my crochet hook slip out of the bag a few times and figured I had better line my bag.

I chose some cotton fabric and measured my bag to begin making my lining.

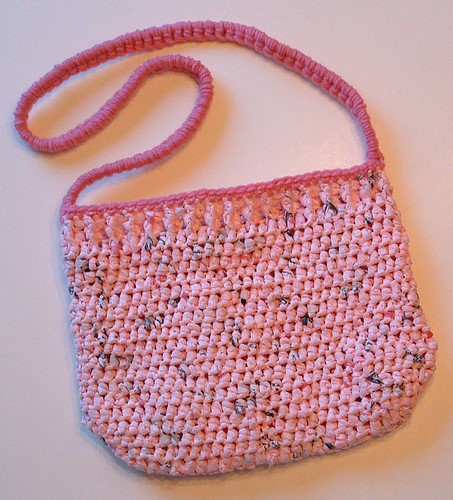
Lining the Pink Passion Plarn Purse

Several people have asked for a picture tutorial on how I lined my pink passion plarn purse. So here are a few pictures I took and I will walk you through a brief explanation on how to line a plarn purse.

I basically create a pocket to slip inside my plarn purses to line them. I simply cut a piece of fabric for the lining and with right sides together and sew it together. Here is the completed lining I made for the recycled Pink Passion Plarn Purse which includes two pockets and a magnetic closure.

First step is to lay out the completed purse on the fabric lining as shown. The bottom of the purse lining is placed on the fold line of the fabric.

Recycled Milk Jug

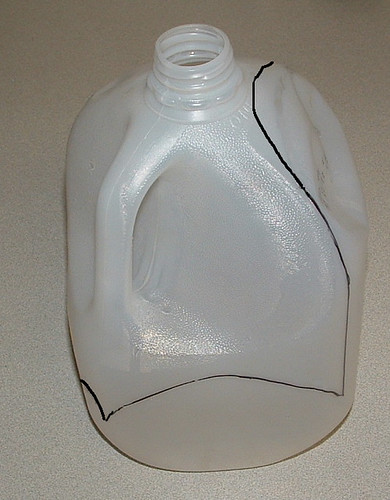
Today I want to share a recycled milk jug project that I saw over at Disney Family Fun. By cutting a milk jug you can create a reusable container that you can use for a lunch box or other purposes. All you need is a plastic one gallon milk jug, a sharp pair of scissors, a marker, a nail or thumb tack, a button and a bit of yarn.

Mark your milk jug as shown and use a sharp pair of scissors to cut away the top and handle portion of the jug.

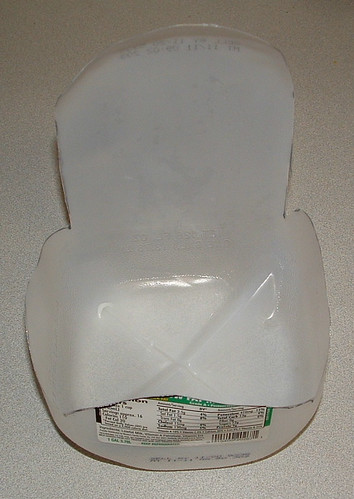
My first attempt was done free hand and I found it difficult to get my shape even when I marked the jug for cutting. I made this little template below and used it as a guide for marking the jug on my 2nd attempt. Just hold it up to the milk jug to help you mark the shape for your cuts.

It’s very important that you cut up high to the top of the milk jug opening to get the curved flap area for your lunch box. I used a small sharp nail to push the holes through on the plastic to create the folds for the flaps. My milk jug had a natural line molded in the plastic that I used for the line for my holes. Once the holes are punched, you can fold over the flaps along the punched edges.

The original recycled craft project called for a Velcro closure but I wanted to create a simple closure using some spare buttons I had on hand along with a scrap of yarn.

Concentrated Homemade Laundry Soap

A few months ago you may remember that I made my first batch of homemade laundry soap. In my first attempt I felt my original soap recipe was a bit too runny and I wanted to try the process again

In this new batch of soap, I made a more concentrated soap by using less water. It’s still liquidy but not so watery which I like much better. I tweaked the original recipe and this is my newest recipe for a more concentrated homemade laundry soap.

Supplies:
Large metal cooking pot at least 4 quarts or bigger
2 gallon plastic bucket for final soap container
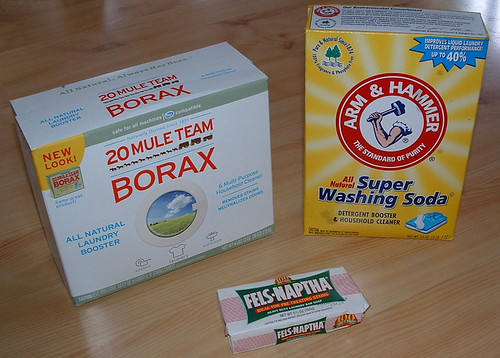
1/2 bar of Fels-Naptha laundry soap
1/2 cup Arm & Hammer washing soda
1/2 cup 20 Mule Team borax powder
6-7 drops of essential oil (Optional)

Directions:
Grate 1/2 of the bar of Fels-Naptha soap and place in cooking pot. Add 6 cups water and heat gently over low to medium-low heat stirring occasionally until the soap melts. Turn heat to low, add the washing soda and the borax stirring until all ingredients are dissolved.

Pour 4 cups of very hot water into the plastic bucket. Now quickly add the cooked soap mixture to the plastic bucket mix and stir well. I added 6-7 drops of lemon essential oil to the mix at this point. This is an optional ingredient but the bit of oil gave my final soap just a hint of fragrance. Now add 1 gallon of hot water to the plastic bucket mix and stir well again. Let the soap mixture sit at least 24 hours to gel.


This recipe resulted in a much less watery soap mix and I use 1/3 cup of soap in my top-loading large washer. For best results I place the soap in the washer and use a little hot water to dissolve the soap before placing my clothes into the washer. As a reminder this soap can be used for stain treatments by either pre-soaking or spot treat the stain directly with a small amount of soap before washing.

~~~~~~~~~~~~~~~~~~~~~~~~~~~~~~~~~~~~~~~~~~~~~~~~~~~~~~~~~~~~~~~~~~~~~~~~~~~~~~~~~~~~~~~~~~~~~~~~~~