This month’s challenge over at Trash to Treasures on Ravelry has been to do a wardrobe re-do. This means to take some old clothing item and transform it into a new and useful item. I have had this striped t-shirt that I have been saving just for such a project. The neckline was frayed and this old tee needed to be upcycled into a new shirt.
 Here is the before photo of my t-shirt.
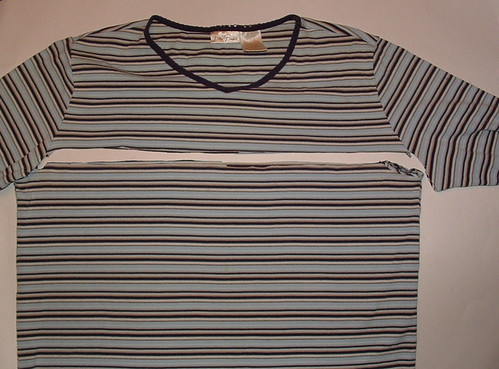
Next I cut off the top of the shirt as shown.
I loosely followed the Drop’s crocheted yoke pattern that was added to the top of a knitted sweater for my project. I first zig-zagged around the top cut edge of my shirt to prevent it from unraveling. I ended up running around the top edge twice just to make sure the seams wouldn’t fray. I chose Lion Wool yarn in midnight blue and it took just one skein (3 ozs) to completed my yoke. Using a #7 steel crochet hook, I worked around the top edge by poking a hole and pulling my blue yarn through the hole. I did a single crochet stitch evenly all long the front, underarms, and the back of the shirt. I used a G hook from this point on.
Once my base row was completed, I needed to reduce the number of stitches around, so I work 2 single crochet stitches together around the entire next round. I then worked round 3 with a double crochet in each stitch and chain 30 (8-1/2″ long) for the sleeve opening on each side of my shirt. From here I worked more decreased evenly over the next rounds while somewhat following the chart in the Drops Design pattern. I did find I had to make more decreases to get the yoke narrowed down but in the end it turned out nicely.


Here is my final crocheted yoke photo. The dark wool just doesn’t want to photograph very clearing but you can click on the photos to supersize them. So if you have an old t-shirt, consider adding a crocheted yoke to give it a new look like I did in this wardrobe re-do project.
That turned out great! What a clever way to spice up the wardrobe without spending anything!
That looks awesome, nice job! I love redoing my wardrobe too–it’s cheaper and you get to wear something no one else has. I just put together this free eBook of T-shirt sewing projects, if you’re interested in doing more wardrobe re-dos: http://www.allfreesewing.com/Refashioning-and-Upcycling/9-Ways-to-Transform-Old-T-Shirts-eBook
Very awesome!!
And thank you for posting to Fibers on Friday 🙂
You are talented and you are giving me far too many craft ideas. Please stop….well NO don’t! 🙂
Thanks
Hey that is so cool! I would never have thought to change something so daggy into something so cute! Well done. Next time you want to photograph something with 2 layers of black, you could place a piece of white paper between the 2 layers so that it brings out the spaces between the black crochet, and also come up above it a little bit more to look down on the gaps.. Just a suggestion.. 🙂
Thanks again.