Close

Newspaper Bags Upcycled into a Water Bottle Holder

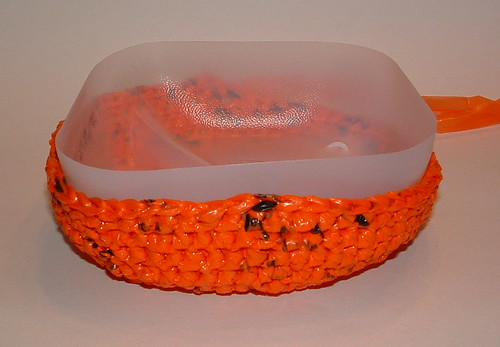
Time for a new recycled plastic bag project. Things have been a little hectic lately and I haven’t been able to craft and post new patterns as frequently as I would like. But this week I was able to get some plastic newspaper bags cut up into plastic bag yarn. I just love this beautiful shade of pink salmon that my local library gets their newspaper delivered in. For those people who may have not read my fat bottom bag post, these beautiful bags are being saved by my local library. I pick them up about twice a week and it’s a wonderful resource for me to be able to obtain unique and colorful bags for my recycled crafting projects.

I actually counted the number of bags I used in this crocheting project. It was 29 plastic bags. I cut them about 1 inch wide and interconnected them together using the loop method. Each newspaper plastic bag results in about 17-18 loops if anyone is interested. Anyway this water bottle holder holds a 32 oz Nalgene bottle or a store bought 1 liter bottle of water. Because these plastic bags are a bit thinner I used a K crochet hook rather than my standard N hook. The smaller hook provided a tighter stitch and a sturdier water bottle holder.

Please enjoy the free crochet pattern below and happy crafting to all!

*****************************************************************************************************************
Recycled Newspaper Bags Water Bottle Holder Pattern

Material Needed: 29 salmon pink newspaper plastic bags cut into 1 inch strips and connect into plarn.
Plastic newspaper sleeve bags were used in this project. Cut the strips and assemble
just as you do in this plarn making tutorial.

Hook:
Metal K (6.5 mm) crochet hook

Water Bottle Holder Size:
Bag – 5-1/2″ wide, 7″ long, with 4″ round bottom
Strap 40″ long & 2″ wide
Fits water bottles that are 32 oz reusable bottles or 1 liter plastic bottles

With pink plarn, Ch 4, Sl St to join in first st of chain to form ring.

Recycled Trick or Treat Bag

Halloween is just around the corner and I’ve been saving plastic orange newspaper bags for quite awhile so I could crochet a recycled trick or treat bag. I just got it finished in time and am here to share the project with everyone.

This trick or treat bag features a milk jug base so its nice and sturdy. With a sharp pair of scissors, just cut around the bottom of the milk jug as shown in the photo below. The jug I used had a line around the base so it made it easy to cut it evenly around the bottom. By recycling a plastic milk jug, you create a trick or treat basket that will hold its shape and your candy nicely.

Once you finish crocheting the bag, you can always add more embellishments like eyes and a mouth to the project. I took a few pieces of VCR tape and created a quick face for my trick or treat bag. So this concludes my Halloween project for the year. Enjoy the free crochet pattern below — Happy Halloween!

_____________________________________________________________________________________
Trick or Treat Plastic Plarn Basket

Materials needed: One ball of orange plastic bags cut into strips 3/4 inch wide and interlocked
to create a ball of plarn – (Approx. 20-25 bags)
Small amount of green plastic bags cut into plarn for strap
One plastic milk jug

Here is my picture tutorial on how to make yarn from recycled plastic bags.

Hook: K (6.5 mm) metal crochet hook

Description: Orange Trick or Treat Basket –
Basket measures 9 inches across front and 6-1/2 inches tall with 14 inch handle strap.

Directions:
Ch 3 and join with a Sl St to form a ring.

Fat Bottom Bag from Recycled Bread Bags


I have been working for several weeks now on a custom-ordered recycled bread bag project. The client wanted a fat bottom bag (FBB) crocheted from bread bags. What made the project unique was that the bread bags are from her husband’s bread factory. She collected bread bags from the factory’s floor of damaged products and mailed them to me to crochet her FBB.

I cut the bread bags into strips about 1/2 inch wide and created plarn using the same method I do for plastic grocery bags. I didn’t count the number of bags used but I believe its around 50 bread bags. I used the FBB English pattern here. I added the flap and button option which is detailed at my plastic fat bottom post link which also has the English chart link as the original pattern is written in Portuguese.

Working with the bread bags was much harder than the thin newspaper bags that I used in my first plarn FBB. The bread bags are so stiff making it difficult to do the gathering portion of the bag. But I was able to get it accomplished and lined the bag for my special order customer.

Here are some photos of the project as it progressed.

Beginning of crocheted shell of FBB


Shell and lining completed

The final photo shows the flap with the button sewn in place. I am excited for my customer to receive her custom-made repurposed bread bags. I hope she enjoys her unique recycled fat bottom purse.


Felted Cell Phone Cozy

You know if you have been reading this blog site for awhile that I’m all into being practical and creating things I need. So I really wanted to have a nice little cell phone holder and I just love felting so I crocheted myself this little cell phone cozy from some scrap wool yarn.


_______________________________________________________________________________________________

Free Felted Cell Phone Cozy Pattern

Crochet this cozy using about an ounce of 100% wool yarn with a G (4mm) crochet hook. Chain 14, single crochet (sc) in 2nd stitch from hook and in each stitch down to end of chain (13 sc). Working around the back side of chain, sc in each stitch to create a seamless cozy. Do not join. Continue working in rounds until your cozy measures 4-1/2 inches long before felting (approx. 19 rounds.) Slip stitch into last few stitches of final round so your finished edge is smooth. Fasten off and weave under ends on the inside of your cozy. Finished size before felting was 3-1/2 inches wide by 4-1/2 inches long.

Buttonhole Loop:
Join yarn with slip stitch in 5th stitch from edge and ch 15. Attach in the 2nd stitch over from loop base to create the buttonhole with a slip stitch. Then Sc back up the chain evenly (approx. 18 Sc’s.) Join with slip stitch back into the beginning with a slip stitch. Finish off and weave under ends.

Felting:
Place your completed cozy inside an old pillowcase and tie it closed with a knot. I felted my cozy 15-20 minutes on the hottest water. Check your cozy after 10 minutes of agitation to make sure it hasn’t felted too much to fit your cell phone. Mine needed more so I put it back into the washer. After a total of 20 minutes, mine was perfect. I pulled it out and cold water rinsed it in my sink. Shape your cozy so it’s square and check to make sure the opening is wide enough to insert your cell phone. If it’s a bit tight, just stretch the opening a little. Air dry and shape as it dries if needed.

My final felted cozy measures 3 inches wide by 4 nches long which fits my Motorola cell phone that is 2-1/4″ wide by 3-3/4″ long. This cozy is a great way to use up scraps of wool yarn you may have on hand. Just make sure you use 100% wool so your project felts properly.

Once your felting is done and its dry, add a 1 inch or larger button as desired to the front of the cozy. Voila you are done — Enjoy your felted cell phone cozy!

Crocheted Baby Poncho


Check out this cute baby poncho project I recently crocheted. This pattern is fantastic and works up so quickly with no seams to sew when you finish. Aggie May’s free poncho pattern makes about a 2T child’s size poncho using a G (4.25 mm) crochet hook. You could add additional stitches in your beginning row to make a larger size.

My poncho has 16 rows before the trim and it’s 16″ long at center from the top. 19″ across the top of shoulders. In case you are wondering, the yarn is some 100% mercerized cotton I found at my local thrift store. I used about 350 yards of the cotton to crochet the poncho.


Click to supersize the closeup photo above. I crocheted around the neckline to create eyelets for a drawstring closure. I worked a SC and chain 2 in each stitch around the neck opening. I then just made a long chain and threaded it through the eyelets to complete my drawstring. And that’s it — The poncho is finished!