Close

Basic BLO Hat Pattern

This post presents my basic back loops only (BLO) hat pattern. As you may know, I crochet lots of hats for charity and wanted to have a basic crocheted hat pattern that is worked all in back loops only. The textured look of working all in back loops makes for a raised stitch line on each round.

It is my hope that you will enjoy this pattern and crochet a few hats for your charity of choice using it. So without further ado, here is my free crochet pattern for my back loops only adult hat.

Back Loops Only (BLO) Basic Hat Pattern

Finished adult hat measures flat: 21 inch circumference by 8.25 inches long
Hook: H (5 mm) US sized crochet hook
Materials: 2.5 ozs Wool or Worsted Weight Yarn; and
Small amount of contrasting color for edging (if desired)

With H hook, Ch 4 and join to form ring. (Or use a Magic Circle to start.)

(Ch-2 counts as first Hdc st.)

W4W 2022 Hat Drive

Warmth for Warriors (W4W) is once again having a hat drive for our troops and Veterans. Wool hats are used overseas and other blends of yarn hats are used stateside for our Veterans in hospitals, other VA facilities and outreach programs. Warmth for Warriors needs and accepts hats all year long. Here is the link to the 2022 hat drive that I am heading up.

Last year W4W received 2852 wool hats and 2074 in acrylic hats. We are excited to start crocheting and knitting hats for this year’s drive. Here is my first batch of hats that I just mailed off to W4W headquarters. You can also find W4W on Facebook here. Need a hat pattern? Check out our hat pattern page here for lots of ideas and free patterns.

Ponytail Girls Hat

You probably have seen these ponytail hats or messy bun hats that people are sporting these days. I crocheted this ponytail girl’s hat for my granddaughter. I looked at a few patterns but didn’t see the size and style that I was exactly looking for. So I set out and created this hat and will share the pattern details below.

I will first say that my GD has very thick hair and so this opening is fairly wide at 3.75 inches. I did use the vertical stripe hat pattern for the basis of my ponytail hat.

I crocheted a chain of 25 to begin for hole for the ponytail and joined it to make a ring. Then I worked 33 double crochet (DC) around the chain ring and then followed the pattern of DCs for 6 rows. I then started working the front and back post DCs. Check your length before you finish off to make sure your hat is long enough.

Below is a closeup photo of the top opening for the ponytail.

Two Stripe Plarn Tote Bag

It is a new year and time for a new recycled bag! What better way to kick off a new year but with a new homemade reusable and upcycled tote bag. This tote bag was crocheted using about 45 brown plastic bags and 12 reddish-colored newspaper delivery sacks.

Here is a closeup of the top and handles.

This bag is very similar to my basic crocheted tote bag pattern but with a few changes including two stripes. The two stripes were added by cutting up 12 recycled plastic bags that newspapers are delivered in. Here is the tutorial link for cutting newspaper sacks into plarn to use as yarn.

I have provided the full new crochet pattern below for everyone’s personal use. As always, my patterns are free and I hope people will enjoy them.

Two Stripe Plarn Tote Bag Crochet Pattern

Materials needed: Plastic bag yarn “Plarn” in main color brown (40+ bags) cut 1 inch wide
and approx. 12 contrasting colored plastic bags for stripes

Hook: N (9 mm) size metal hook

Description: Recycled Plastic Tote Bag

Bag measures 12 inches wide and 12 inches long with 5 inch handles

Directions:
Ch 28

Rectangle Granny Blanket

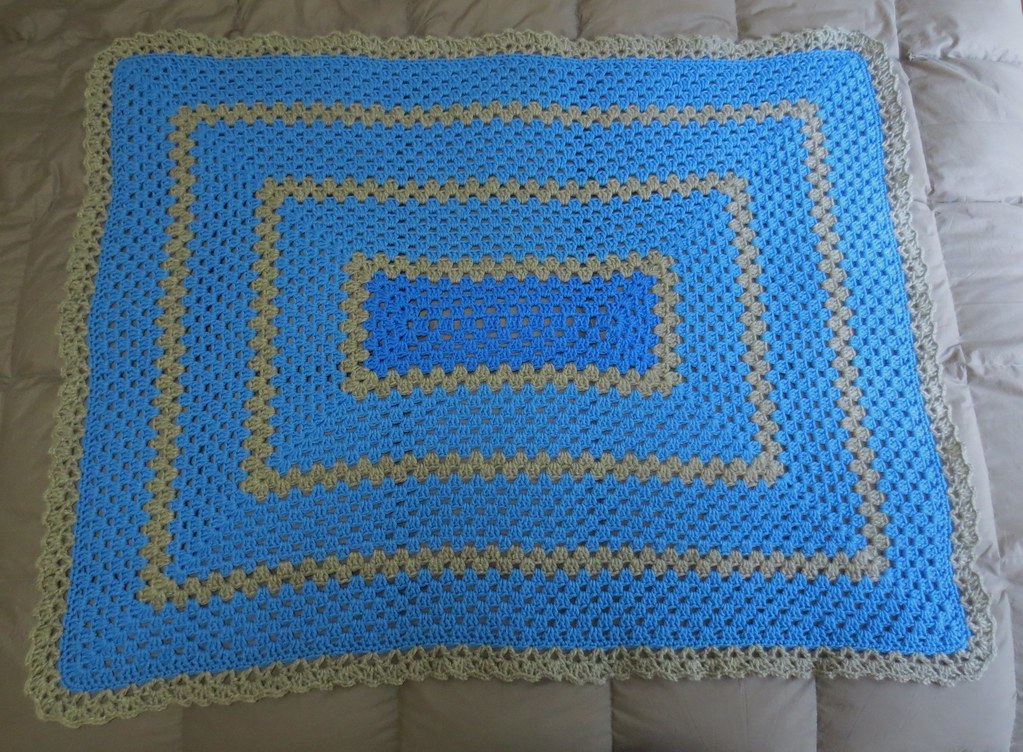
I just delivered this rectangle granny blanket to my local VA outreach representative. They come once a month from Spokane and each month I try and have a charity craft donation for them. The VA outreach program rep takes the items back to the VA hospital and uses them where needed.

I love the look of a granny blanket and this rectangle granny blanket pattern is awesome. You don’t have to join squares and it works up so nicely. Plus I love using various skeins of yarn to work up a unique blanket for donation.

I do just a few mods on the original crochet pattern. For the joining corner, I add my yarn at the chain 1 corner then chain 3 and work 2 more DC stitches at the corner. So I have basically 3 DCs at the corner to start a new color. I then continue around the blanket following the pattern until I get back to the beginning of the round. I work 3 DCs in the same corner space when I started and then chain 1 and join to the top of the beginning chain 3. Makes for the neat corner and the join looks better in my opinion.

If I am not changing colors, after the join at the corner, I turn my work so I am looking at the back of the blanket. I slip stitch back into the corner chain 1 space. Then turn my work back to the right side of the blanket and work 2 DCs into the same chain 1 space. So I have 3 DCs at start of corner counting the chain 3 as a DC. Again I think this corner joining tip looks better then slip stitching over several stitches to reach the corner.

Here is a closeup photo of the trim edging that I added.