Close

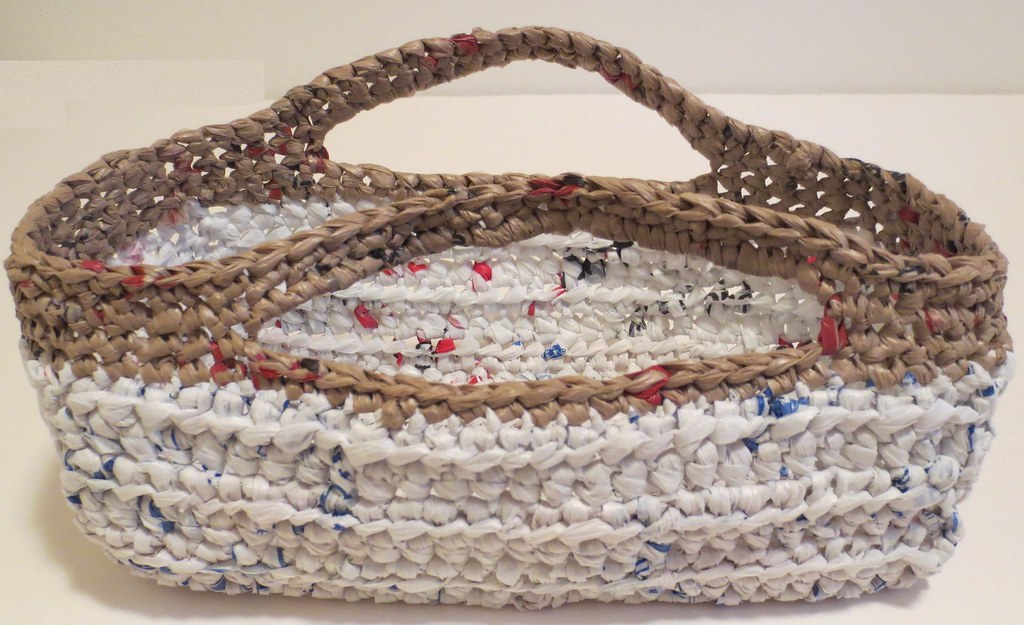
Small Recycled Plastic Basket

I am back to share a new recycled plastic bag plarn project. In this project, I set out to create a small basket tray to use for holding items for an upcoming charity fundraiser. I wanted a tray type basket to hold the items and also one that could be reused for kitchen or bath items later.

This was a fun and quick plastic basket that I crocheted using less than 20 recycled plastic retail bags made into plarn using the looping method of cutting and assembling the bags. Below you will find the free crochet pattern and details. Enjoy the pattern and happy crocheting to all!

Crocheted Plarn Basket Tray Pattern
Materials:
Plastic bags cut into strips 1 inch wide to create plarn yarn. Here are the pieces I crocheted to put the plastic tray basket together. (Approx. 13 bags in white and 4 brown bags)

All pattern details are written in US crochet terms.

Hook: J (6 mm) size crochet hook
Description: Crocheted Recycled Plastic Bag Basket Tray
Basket measures 8-3/4 inches long, 4 inches tall, 3-3/4 inch wide ends and with 5-3/4 inch handles

Directions:
Row 1
Ch 30, Hdc in 3rd st from hook and in each st down to end. Ch 2, turn. (27)

Mother Bear Hoodie Project

Here is my latest Mother Bear I crocheted with a hoodie. This bear was crocheted for the Mother Bear Project and features a hood with ties. My original Mother Bear hoodie pattern did not include ties. Another Mother Bear crocheter on Ravelry, TeaLover, added ties to her bear’s hoodie after crocheting my pattern. I just loved how the ties turned out. It is like a built in scarf and looks so cute on the hoodies she made. So with her help, I added ties to my hoodie pattern too.

It is real easy and the ties are crocheted right onto the hoodie before finishing off the project. Here are the changes to make to the original pattern to add the ties. First don’t finish off after the last row, chain 25

Breast Cancer Awareness Month

October is breast cancer awareness month. It is a good time to post an update about my own cancer battle. If you have been a long time reader of my blog you will know that in 2008 I was diagnosed with breast cancer. I started blogging about my cancer under what I called my pink journey. You can click on the prior link and read the old posts if you are interested in my experience.

It has been over 8 years now since cancer came a knocking on my door. In the last several years, I can finally rest easier and not have cancer on my mind at nearly every thought. I am so blessed to say that I am still cancer free and just thank God each and every day for my continued good health. So many people are not so lucky.

My heart breaks for those that are battling this beast. I grieve for those who have lost their battle and pray for comfort for their families. Cancer sucks!! I hate it and can only hope that some day there may be a cure. Can you imagine a world without cancer?

Wavy Ripple Lapghan

Just finished up crocheting this blue and green wavy ripple lapghan for the Warmth for Warriors. I used the basic wavy ripple blanket pattern of mine. This blanket has the wave going side to side rather than up and down.

I used Red Heart yarns in navy blue and melon green to complete the lapghan. I crocheted 4 rows in each color. I started the lapghan with a chain of 107

Mini Cuffed Christmas Stocking Pattern

I make many mini Christmas stockings each year for the Warmth for Warriors group. I decided I wanted to try a new crochet pattern to change things up a bit on my stocking making and came up with this new pattern. I took my cuffed baby booties pattern and tweaked it to create this mini cuffed Christmas stocking. The pattern is easy and can be crocheted in less than an hour plus it is free so enjoy the crochet pattern below.

Mini Christmas Cuffed Stocking Pattern

Crochet hook: H (5 mm) hook
Yarn: 3/4 oz Worst Weight Yarn (42-50 yards depending on yarn)
Finished size: 6 inches tall, 4.75” wide at toe, & 2.75” wide at top.

Rnd 1
Ch 2, work 9 Sc in 2nd ch from hook. (You can also start with a magic circle and work 9 Sc’s in circle.) Don’t join as the toe section is worked in rounds without joining. Place a stitch marker at the beginning of each round. (9 sts)