Close

Mini Christmas Socks

Merry Christmas! What better way to celebrate the holidays than with recycled crafting. Here is my latest using this ever so cute little Christmas sock pattern. I used a “H” (5 mm) crochet hook and worked the pattern using 8 recycled newspaper plastic bags and one large green retail bag for the trim. The pattern doesn’t state if you should join each round or just work in the round. I single crocheted in the round without joining except for the final round of each color. On the final round of each color, I did join with a slip stitch to keep each color edge smooth. My finished plarn mini stocking is 6 inches long.

Here is the same pattern crocheted with some ww Christmas yarn.

I made my yarn stocking a bit bigger than the pattern called for by adding a few additional stitches and rows. This 2nd stocking is about 7-1/2″ long. So whether your working with plarn (plastic bag yarn) or regular worst yarn, this pattern is super fast and easy. Enjoy!

More Crocheted Towel Toppers

I have been on a crocheted towel topper kick lately. I have crocheted several different ones including ones with rings and those with button closures. I love doing the no-cutting and no-sewing toppers with double layered towels as they are so nice and thick.

Here is the free crochet pattern and picture tutorial for making double layered towel toppers. The method I use is to just fold the towel in half and using a small steel crochet hook, single crochet the base row through both layers along the top of the towel edge. Once this base row is complete, you switch over to a larger hook and the towel topper works up quickly using only about an ounce of yarn.

I added a jingle bell for the button closure on this towel. Just chain 2-3 stitches for a larger button opening than the original pattern calls for when you crochet the buttonhole.

So if you need a last minute gift idea, grab a towel and some yarn and crochet one of these pretty towel toppers. They really are a wonderful handcrafted gift.

Triangle Ring Towel Topper

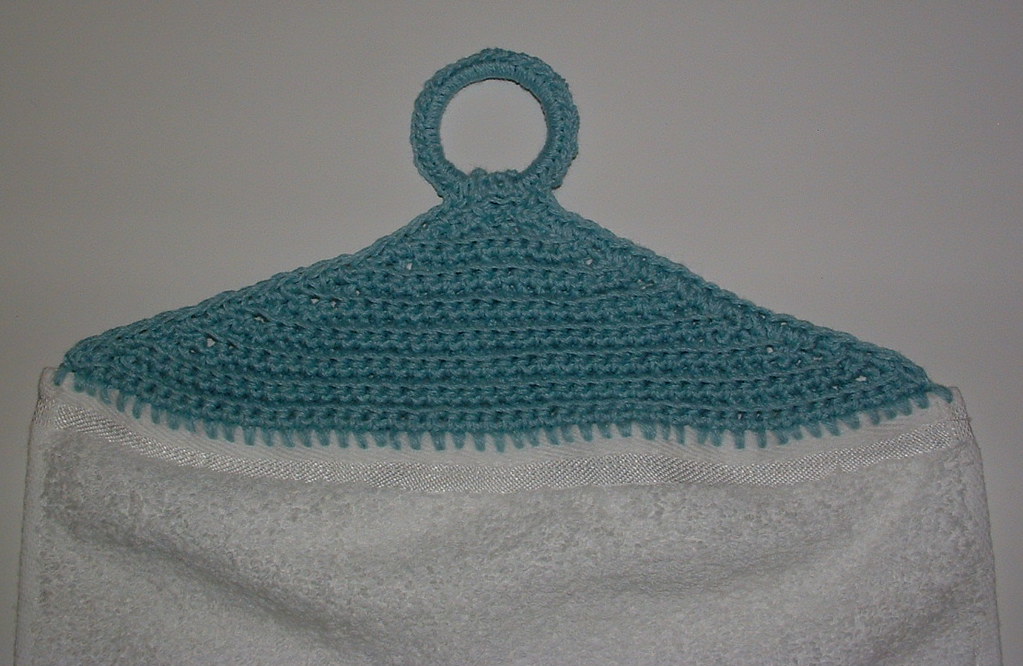
My triangle towel topper uses a finger towel and a recycled plastic milk jug ring for a hanger. I really like the idea of the round ring as you can hang up the towel on a cabinet knob or hang it up over a hook. It works up very quickly and I made the first one using less than an ounce of thrift store sport cotton. This one had 48 stitches along the top as the yarn was thinner.

Here is a closeup of the finished top. You can click on the photo to supersize it.

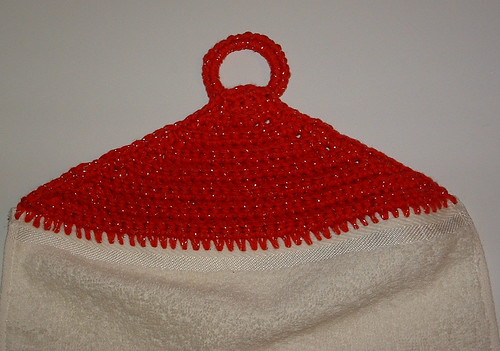
When I made the red triangle towel topper, I used regular cotton weight yarn. It’s Bernat Christmas Sparkle.

Because the red triangle towel topper is a thicker weight yarn, it has 44 stitches across the top edge of the towel to start. But don’t worry about the number of stitches across the top, just do your single crochet stitches evenly along the top edge. You can always adjust your stitches as needed as you work your topper. I did one extra row for the flap on the red topper. With 4 rows, the turning flap was a bit longer but you can do just 3 rows if that works for you like I did with the sport weight yarn on the blue triangle towel topper.

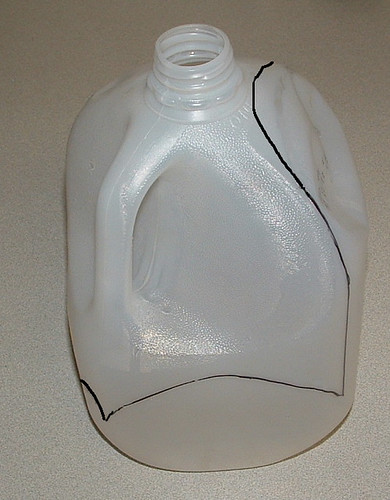
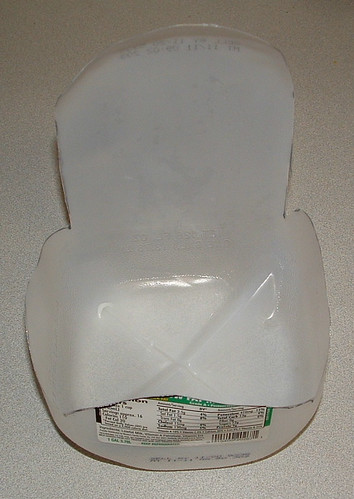
I used Christmas finger towels for this project but you can use towels of different widths or lengths. Just adjust your stitches as needed to end with a 4-stitch wide flap for the fold over the plastic ring. I used plastic milk jug rings but you can also use recycled juice or other round rings for this project. Make sure you crochet lots of stitches around the plastic ring to cover it entirely with the yarn. I found this gives the project a nice look and no one with ever know that you used an old plastic jug ring for your crochet project.

As always please enjoy the free pattern below and happy crocheting to all!


Crocheted Triangle Ring Towel Topper

Materials needed:
Finger towel – 10 inches wide by 16 inches long used
Plastic milk jug ring 1-1/2″ wide
1 oz. Cotton yarn

Finished topper: 10″ wide & 5″ long from top of ring to towel top edge

Hooks:
#7 Steel crochet hook
G (4-4.25 mm) crochet hook

Directions:
Because finger towels are shorter, there is no cutting or sewing necessary to begin your base row. You will use the steel hook to poke the first hole into the right side corner and pull the yarn through the hole. Then use the G hook to complete your first Sc st. Then move onto the next hole until you have worked completely across the base row evenly with your stitching. Once you have the base row done, you will only be crocheting with the G hook.

Row 1
Using the steel crochet hook as explained above to poke holes, Sc evenly along the top edge of towel.

Recycled Milk Jug

Today I want to share a recycled milk jug project that I saw over at Disney Family Fun. By cutting a milk jug you can create a reusable container that you can use for a lunch box or other purposes. All you need is a plastic one gallon milk jug, a sharp pair of scissors, a marker, a nail or thumb tack, a button and a bit of yarn.

Mark your milk jug as shown and use a sharp pair of scissors to cut away the top and handle portion of the jug.

My first attempt was done free hand and I found it difficult to get my shape even when I marked the jug for cutting. I made this little template below and used it as a guide for marking the jug on my 2nd attempt. Just hold it up to the milk jug to help you mark the shape for your cuts.

It’s very important that you cut up high to the top of the milk jug opening to get the curved flap area for your lunch box. I used a small sharp nail to push the holes through on the plastic to create the folds for the flaps. My milk jug had a natural line molded in the plastic that I used for the line for my holes. Once the holes are punched, you can fold over the flaps along the punched edges.

The original recycled craft project called for a Velcro closure but I wanted to create a simple closure using some spare buttons I had on hand along with a scrap of yarn.

Cluster Stitch Recycled Gift Bag

This week I present a variation of my cluster stitch bag that I made recently. The main body of this bag is crocheted using recycled plastic bags that have been cut into plarn using the looping method. I have a picture tutorial here for making plarn from plastic bags should you need instructions. Just click on the green link.

I wanted to add a gift bag type closure to the original pattern to create a reusable gift bag. I used some Christmas cotton to top this plarn bag and created a looped handle to finish off my little gift bag. The looped handle works wonderfully for closing the bag. I plan on crocheting several of these bags to use for gift bags for Christmas. They work up quickly and with the looped handle, you have a ready-made gift bag that doesn’t even require a bow.

Special thanks to Helen over at CrochetN’Crafts who was my inspiration for this project. So grab a few of those plastic bags laying around and whip yourself up a beautiful recycled gift bag for Christmas!


Cluster Stitch Plarn Gift Bag Pattern

Materials needed:
Plastic bag yarn “Plarn” about 10 plastic grocery bags
1/2 oz Bernat Holidays Red Sparkle cotton yarn for trim and handle

Hooks:
J (6 mm) metal crochet hook for bag
H (5 mm) hook for top trim and handle

Description: Recycled Plastic Bag Cluster Stitch Gift Bag
Bag measures 6″ wide and 4-3/4″ tall with 12″ handle and 5-1/4″ wide at base

Cluster Stitch Details:
Beg Cluster: Ch 2, (Yo, insert hook into sp indicated, yo and pull through, yo and pull through 2 lps on hook) 4 times, 5 lps on hook, yo and pull through all 5 lps, Ch 1.

Cluster: (Yo, insert hook into sp indicated, yo and pull through, yo and pull through 2 lps on hook) 5 times, 6 lps on hook, yo and pull through all 6 lps, Ch 1.

Directions:
Using J hook with plarn, Ch 11