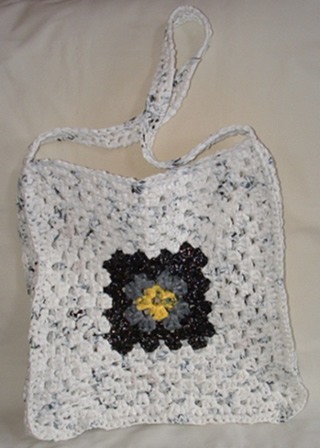
This crocheted Eco tote features a granny square motif and recycled materials to create an unique look. I used yellow and grey plastic grocery bags, vcr vhs tape, and white plastic retail bags in this project. My goal in creating this Eco tote was to crochet a bag that would be strong enough to use as a book bag and could be used for an everyday carry tote. I also crocheted this bag as a Crochet-a-Long (CAL) at one of my favorite craft website forums Crochetville.
My Eco tote measurements are 12″ wide, 13″ long, 1-1/2″ deep at sides with strap that is 1-1/4″ wide and 28″ long. I have included some closeup pictures below to help you in this project. I must warn you that I did have problems keeping my tote bag square. I believe it’s because of the different materials that I used and because the plastic tends to stretch a bit during crocheting.
Closeup of edging on bag
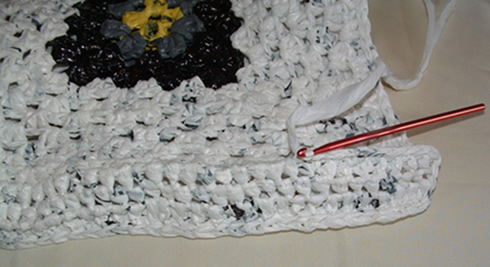
Click to view full-sized
Closeup of handle attachment
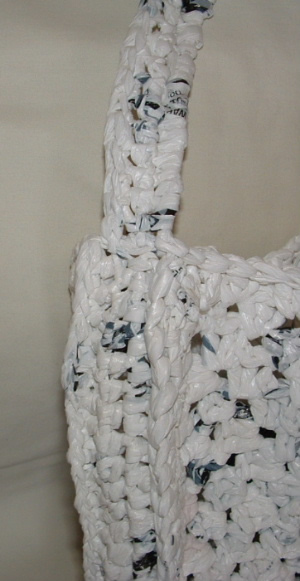
Click to view full-sized
___________________________________________________________
Plastic Eco Tote Pattern
Size: Approx. 12″ square bag with strap that is 1-1/4 inches wide and 28 inches long.
Hook: N (9 mm) metal crochet hook used in this Motif pattern.
Materials: Plastic bag yarn and 2 partial reels of vcr vhs tape.
With center color (Yellow shown) Ch 4, Sl St to form ring.
Rnd 1
Using Yellow plastic bag yarn, Ch 2, (counts as 1 Hdc) in ring work 2 Hdc,
Ch 1, 3 Hdc, Ch 1, 3 Hdc, Ch1, 3 Hdc
Ch 1, Sl St to top of Ch 2. (4 corners & 4 shells made)
Fasten off and weave ends under on back side of Motif.
Rnd 2
With next color (Grey) attach in any Ch 1 corner space.
Ch 2, 2 Hdc, Ch1, 3 Hdc, all in the same ch 1 corner space.
*Sk next 3 Hdc, 3 Hdc, Ch 1, 3 Hdc, all in the next Ch 1 corner space.*
Repeat between * 2 more times, Sl St to top of the beginning Ch 2.
Fasten off and weave ends under on back side of Motif.
Rnd 3
With next color (Black – vcr vhs tape shown ) attach in any Ch 1 corner space.
(Use double strand of vhs tape and crochet with both strands together.)
Ch 2, 2 Hdc, Ch1, 3 Hdc, all in the same ch 1 corner space.
*Sk next 3 Hdc, 3 Hdc, Ch 1, 3 Hdc, all in the next Ch 1 corner space.*
Repeat between * 2 more times, Sl St to top of the beginning Ch 2.
Rnd 4
Sl St across remaining Hdc’s to corner.
Ch 2 (counts as 1 Hdc) 2 Hdc, Ch 1, 3 Hdc, all in the corner space.
*Sk 3 Hdc, make 3 Hdc in between shells, Sk next shell, make 3 Hdc, Ch 1,
3 Hdc in corner.* Repeat 2 more times then Sl St to top of first Hdc.
Fasten off and weave ends under on back side of Motif.
Rnd 5-12
Using White bag yarn, attach in any Ch 1 corner space.
Ch 2 (counts as 1 Hdc) 2 Hdc, Ch 1, 3 Hdc, all in the corner space.
Continue working in established pattern of
Sk 3 Hdc (shell), 3 Hdc in between each of the shells,
Sk next shell, until you reach the corner again
and then make 3 Hdc, Ch 1, 3 Hdc in each corner.
At the completion of each rnd, Sl St to top of the beginning Ch 2 and Sl St to corner space.
Then begin again with Ch 2 (counts as 1 Hdc) 2 Hdc, Ch 1, 3 Hdc, all in the corner space and so on.
Complete 8 rnds using white bag yarn.
Fasten off and weave ends under on back side of Motif.
Make two Motifs panels.
At end of second Motif panel, leave your white yarn attached. Sl St to corner.
Sides &
Bottom
In corner space, Ch 2. Hdc in ea st down side of bag to bottom.
Work 3 Hdc in corner, then Hdc in ea st to other bottom corner, work 3 Hdc in corner,
then working up other side of bag, Hdc in ea st to top.
Sl St across top edge of bag. Don’t turn.
Hdc in ea st down side of bag, across bottom and back up other side to top edge. Ch 2, Turn.
Hdc back down side, across bottom and back up other side to top edge again. Turn. Don’t FO.
Put wrong sides of Motifs together. Panel that has sides and bottom will now be attached to other panel with a Sc in ea st around
through both layers. This creates a raised edge to sides and bottom of bag.
To create raised edge on other side of bag, fold bag over between last rnd of granny square sts and Hdc sts.
Turn and Sl St over to folded edge and Sc in between ea st around entire bag. (See closeup photo above.)
(I used a smaller hook which makes it easier to st between rnds and did a loose Sc which creates the raised edge to match other raised edge.)
Sl St across top edge of bag and end with a Sl St at outside top edge bag. Don’t FO.
Strap
With yarn attached at top edge, Ch 60 for strap handle. Join with a Sl St at top edge of opposite side.
Sc around chain back down to other side and join with a Sc into st next to starting st of strap at top edge. Turn.
Working back up strap, Sc in ea st of strap to other side. Join with a Sc into st next to last joining st at top edge.
Turn and Sc in ea st of the strap back to other side. Join with a Sc next to last joining st at top edge.
Finish off by working a Sl st into bag to create a smooth finish to strap attachment. Weave under ends and FO.
(See closeup photo above for strap attachment.)
If you have any questions or find discrepancies in this pattern, please email me using contact tab above.
Abbreviations:
Ch – Chain
FO – Finish Off
Hdc – Half Double Crochet
Sc – Single Crochet
Sl St – Slip Stitch
St – Stitch
Sk – Skip
Rnd – Round
This pattern is copyrighted by Cindy at My Recycled Bags {dot com} and may only be used for private individual use. No commercial sales or use is permitted. Links to this pattern are acceptable. Copyright 2007.
****Please do not copy my patterns on your blog site or post my patterns on Internet sites. I do not allow my patterns to be republished without expressed written permission. Posting of my patterns, without written permission is in violation of my copyrights and is content theft.
Love this! The granny square is adorable. Great make it from scratch
What is plastic bag yarn? This looks great!
Celeste,
Plastic bag yarn is created from cutting plastic bags into strips and tying them together to make a ball of yarn. Here is the link on how to do it https://www.stg1.myrecycledbags.com/2007/02/17/instructions-for-cutting-plastic-bags-creating-recycled-plastic-yarn/
Check it out as it’s a great way to recycle all those plastic bags we collect!
This is awesome!!!!!! I’ve just started using some eco friendly bags again but what a great way to do it by making them out of the recycled materials!!!!
Thanks for sharing this great idea!
Heidi
My new favorite at this site. Now if I’d just learn to crochet I could make some of these cool things!
Very cute,,,i have some handmade handbags made from plastic bags too, you can check out my shop with my own products.
I needed a baseball cap. So I took your idea and inprovised me one I knitted and crocheted a couple baseball caps. Only thing I did was add some scrap craft foam my neighbor was going to throw out and used it to reenforce the bill.